Getting Started
Before getting started, please make sure you have satisfied all the prerequisites.
Set up GitHub account and SSH key
If you do not yet have a GitHub account, create one.
Set up authentication with GitHub
If you haven't already, set up authentication with GitHub. The recommended way of doing this is using gh, the GitHub CLI tool. Run the following command:
$ gh auth login
Then select > GitHub.com and HTTPS if you prefer to authenticate via HTTPS, or SSH if you prefer to authenticate via SSH. The former uses a token and the latter uses a public/private key pair that it installs as part of the login procedure. After agreeing to authenticate Git with your GitHub credentials, select Login with a web browser, copy the one-time code printed on the command prompt, and press Enter. You will then be taken to github.com in your browser. After entering your credentials and pasting the one-time code, authentication will be completed.
Create your repository
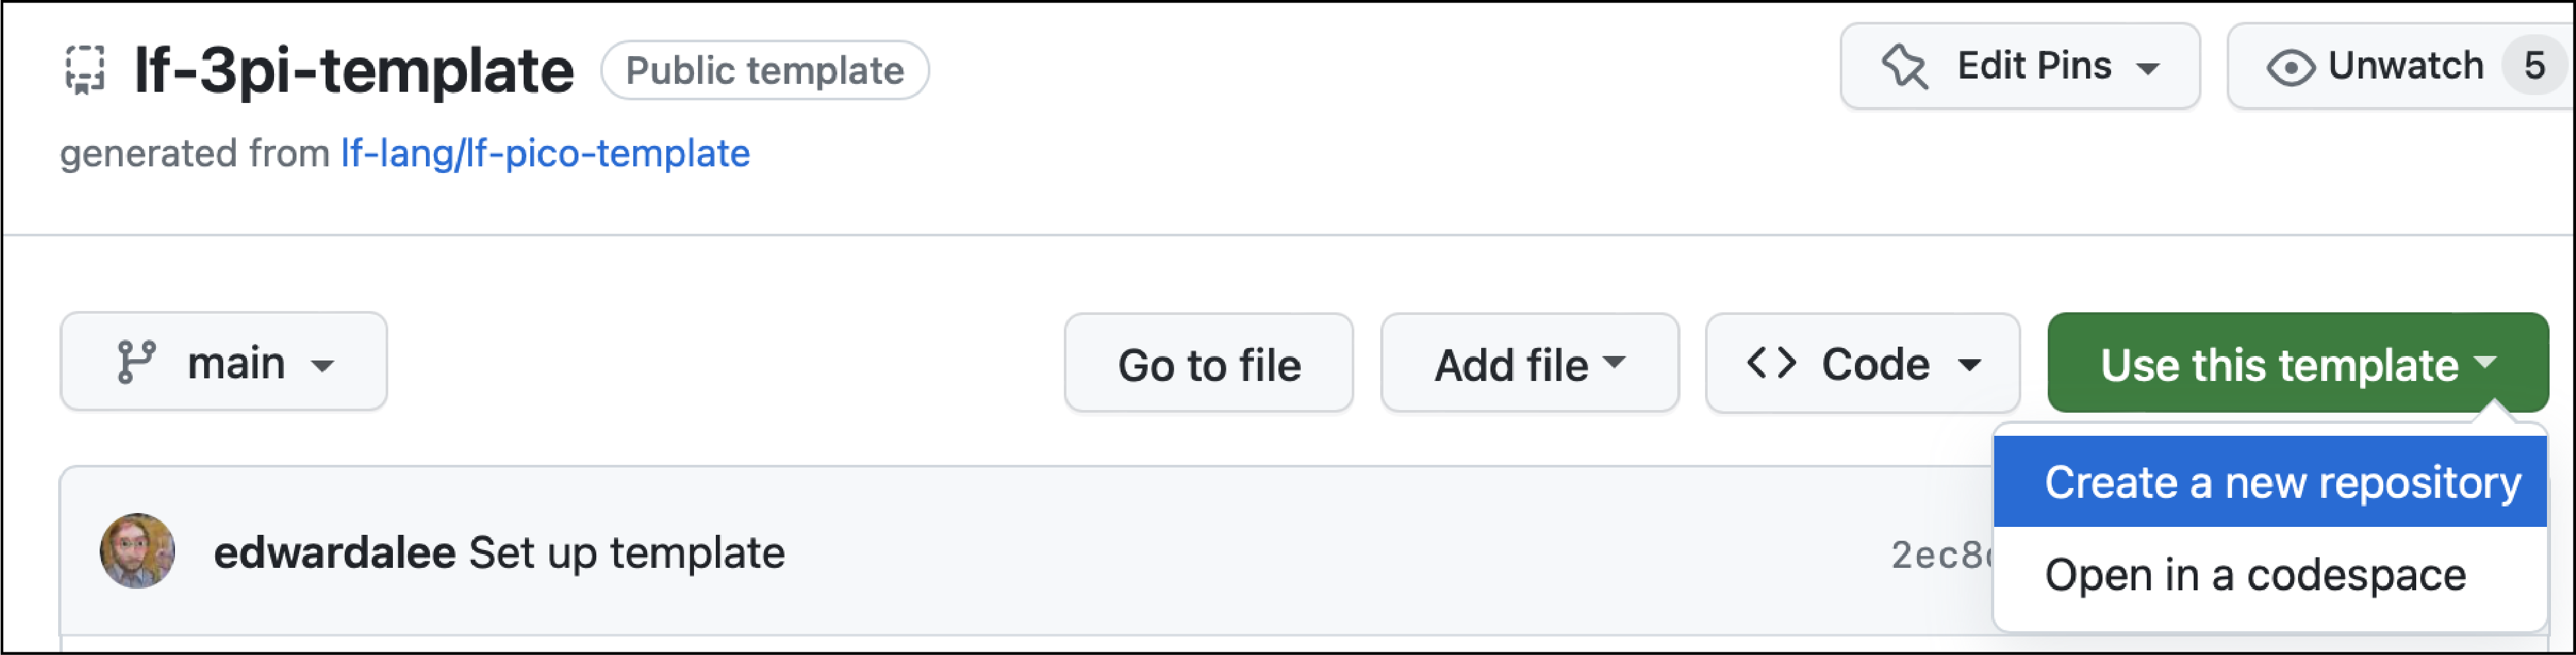
Start by creating a new private repository on GitHub based on the lf-3pi-template repository, which provides a starting point for students to carry out the exercises in this lab and to develop further applications using the Raspberry Pi Pico board and the Pololu 3pi+ 2040 robot.
Navigate to the lf-3pi-template repository. Select "Use this template" and "Create a new repository", as shown here:
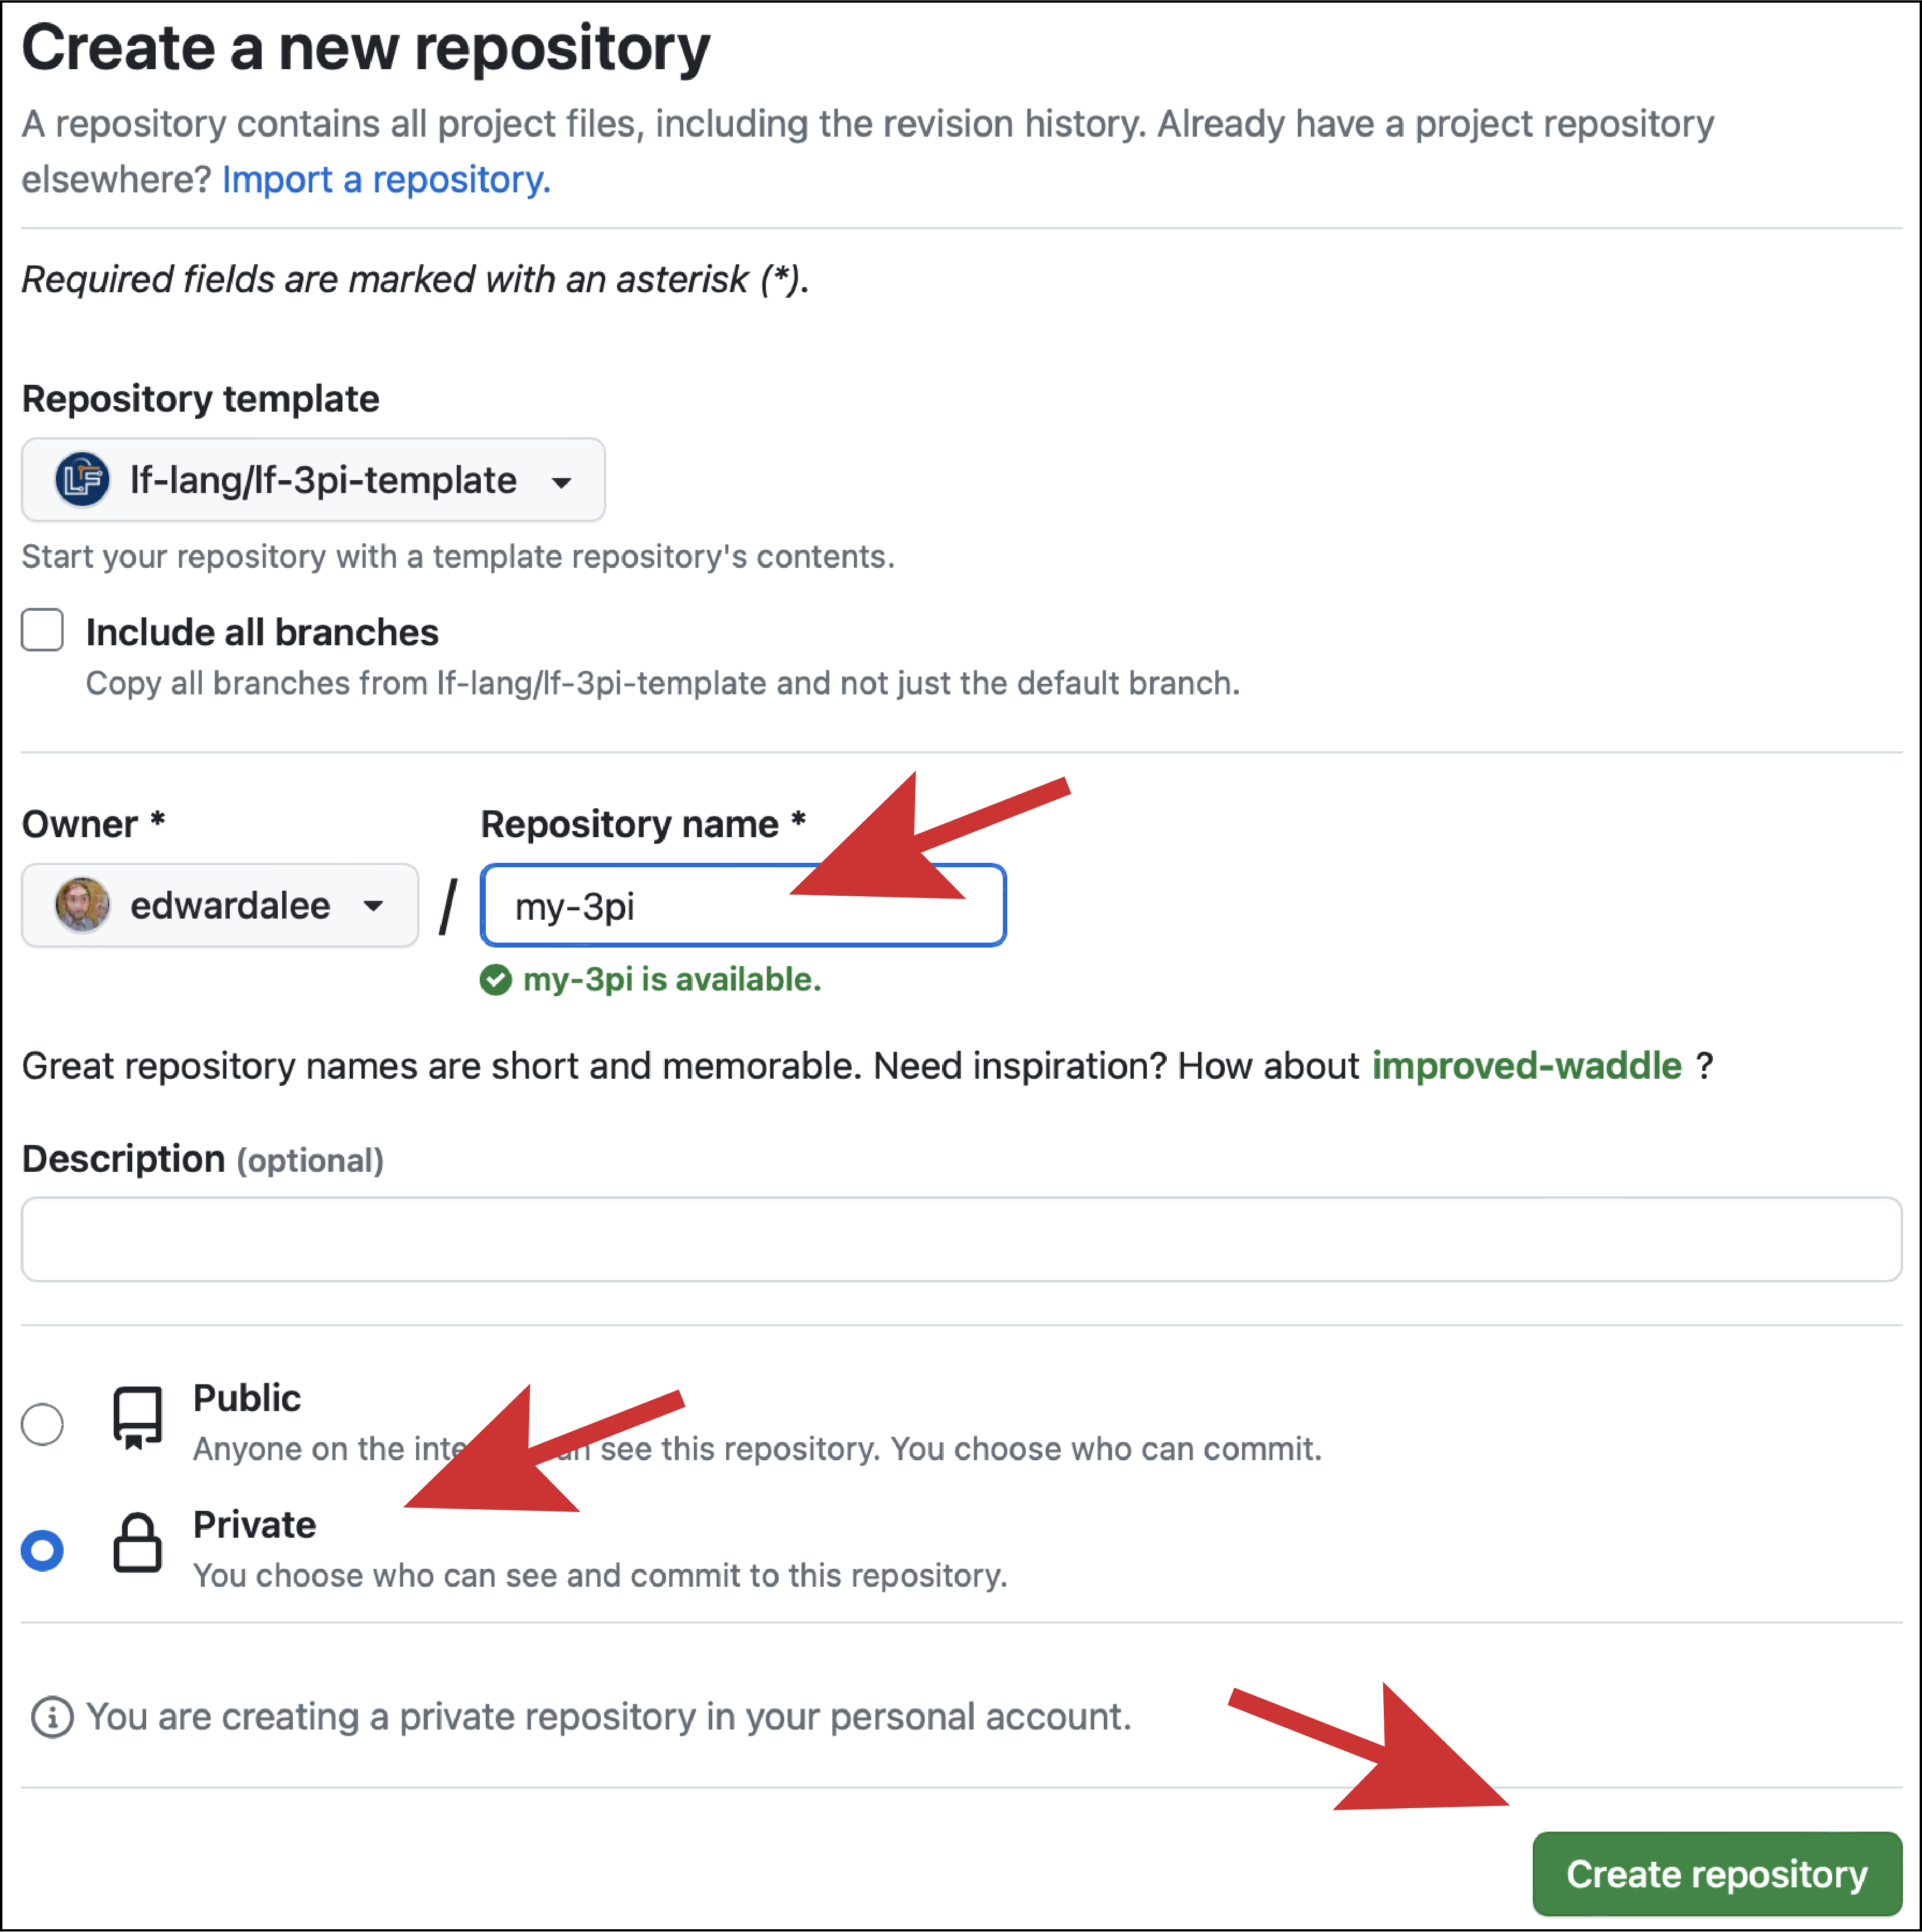
Give your repo a name and click on "Create repository":
Clone your repository
On the command line on your host machine, change directory to the location where you would like to check out your repository. Let us assume that you named your repo my-3pi. Check it out using the following command (where <username> must be substituted with your GitHub username):
$ gh repo clone <username>/my-3pi
This will create a directory called my-3pi in the current working directory.
Note for existing GitHub users
If you are an existing GitHub user and have already set up a public/private key pair (or have done so by selecting
SSHas the protocol when runninggh auth login), you can also clone the repo as follows:$ git clone git@github.com/<username>/<reponame>.git
Troubleshooting (Unknown Key Fingerprint)
If you are using the SSH protocol, then
gh repo clonemay report something like:The authenticity of host 'github.com (...)' cannot be established.and prompt you to with the following question:
Are you sure you want to continue connecting (yes/no)?The reason for this is that the key used by
github.comis not yet known by your machine. Once you typeyesand Enter, the fingerprint of GitHub's public key will be added to~/.ssh/known_hosts. Only when GitHub changes its public key will this warning reappear. This feature of SSH is meant to avoid man-in-the-middle attacks.
Note for VM users If you are using the VM image, you can skip the subsequent step; you do not have to update or initialize the
pico-sdksubmodule in your repository because it is already present in~/pico-sdk.
The template includes raspberrypi/pico-sdk as a submodule, which itself also has a lot of submodules. We recommend against using the --recursive flag because we do not need to recursively clone the submodules inside of pico-sdk. Instead, change directory into the root of your clone and run:
$ git submodule update --init
If pico-sdk was checked out correctly running git submodule in the root of the repository will show the hash without a - preceding it,
e.g.: a1438dff1d38bd9c65dbd693f0e5db4b9ae91779 pico-sdk (2.2.0).
Configure Nix
Note for VM users
If you are using the VM image, you can skip this step. You will never have to invoke
nixand can ignore any reminders about doing this.
To create a reproducible unix shell environment that installs all required dependency applications, we use the nix package manager, which has support for Linux, macOS, and Windows (via WSL). See prerequisites for installation instructions. If you prefer to manage dependencies yourself and not rely on nix, follow the instructions for a non-nix setup.
After installation, run the following in the shell to enable the experimental nix flakes feature, which helps to create more consistent builds:
$ mkdir -p ~/.config/nix
$ echo "experimental-features = nix-command flakes" >> ~/.config/nix/nix.conf
To install the dependencies, run the following in the root of your repository:
$ nix develop
This should automatically download and install specific revisions of the gcc-arm toolchain, openocd, and picotool. These packages will be required compiling, flashing and debugging C code for the RP2040.
(You can alternatively manually install the Raspberry Pi Pico Tools.)
If you hit any error while running nix develop, see troubleshooting instructions below.
Troubleshooting (Linux/WSL)
You may see an error message like this when running the
nix developcommand:error: … while fetching the input 'git+file:///home/osboxes/lf-lang/my-3pi' error: cannot connect to socket at '/nix/var/nix/daemon-socket/socket': Permission deniedThis means that your user is not a member of the
nix-usersgroup. To fix this, see prerequisites.
Troubleshooting (ARM/Apple Silicon Mac)
As of August 1, 2023, the stable version of nix does not support ARM/Apple Silicon Macs. You may see an error message like this when running the
nix developcommand:is not available on the requested hostPlatformYou can work around this issue by setting up an environmental variable and running the nix command with an additional argument,
--impure, like this:$ export NIXPKGS_ALLOW_UNSUPPORTED_SYSTEM=1 $ nix develop --impure