VS Code Extension
The Lingua Franca extension for Visual Studio Code (VS Code) provides syntax-directed editing capability, compilation, diagram synthesis and a package explorer for Lingua Franca programs.
Usage
Creating a New Project
You can create a new LF project either manually by creating an LF file or by using the Lingo Package Manager.
Option 1: Create a Project Using the Lingo Package Manager
- After installing the Lingo Package Manager, create an empty directory to serve as the root of your new package.
- Open the folder in VS Code.
- Open the terminal in this folder and run the lingo init command.
This will set up a new LF package with the following structure:
├── .
│   ├── src/
│   │  └── Main.lf
└── └── Lingo.toml # Configuration file for current package
Option 2: Create a New LF File
- Go to File > New File... and select
New Lingua Franca File. - Save the file in a directory called
srcto ensure that generated code is placed in a parallelsrc-gendirectory. For example, if your file is calledFoo.lf, the directory structure after building will look like this:
├── .
│   ├── bin/
│   │  └── Foo
│   ├── src/
│   │  └── Foo.lf
│   ├── src-gen/
│   │  └── Foo/
...
If you manually create the Lingo.toml file, place it adjacent to the src folder in the root directory of the package. This file serves as a configuration for the package, allowing you to specify the package name, version, and other metadata, including any dependencies you want to install.
Opening an Existing LF Project
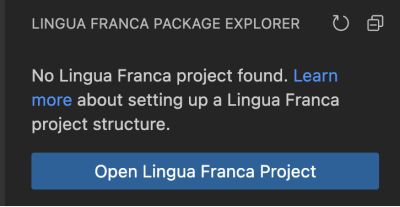
To open an existing LF project in VS Code, select the package root as your workspace. Ensure that the selected project adheres to the correct project structure to enable the Package Explorer. If the workspace is not recognized as a valid Lingua Franca package, an error message will appear when you attempt to open the Package Explorer:
Rendering Diagrams
To show the diagram for the currently active Lingua Franca file, click on the diagrams icon at the upper right:
By default, the diagram is rendered to the right of the editor. This is usually inconvenient because the diagrams and the code both tend to be wide. You can drag the diagram to the bottom, or, more usefully, change the default:
- Go to Code>Settings>Settings (or Command-,)
- Select the User tab to change your personal settings (or Workspace for just this workspace)
- Search for "workbench.editor.openSideBySideDirection".
- Change the setting from right to down.
Compilation
To compile the .lf source, open the command palette (Ctrl + Shift + P) and then enter Lingua Franca: Build.
Running
You can also build and immediately afterwards run your code by opening the command palette (Ctrl + Shift + P) and then entering Lingua Franca: Build and Run.
Running the code can also be done from the VS Code terminal by executing the generated file in ./bin.
Package Explorer
The Lingua Franca Package Explorer can be accessed by clicking on the LF icon in the activity bar on the left side of the screen. Once opened, the Package Explorer displays a Tree View with the following structure:
├── <Package Name>
│   ├── Installed Packages
│   ├── Local Libraries
└── └── Source Files
-
Installed Packages: Lists packages installed via the Lingo Package Manager, located in the
./build/lfc_includedirectory (if any). -
Local Libraries: Displays locally defined library files (e.g., reusable reactors), located in the
./src/libdirectory. -
Source Files: Contains the LF source files created by the developer, located in the
./src/directory.
The Source Files section is always present as it reflects the main LF files in the package. However, the Installed Packages and Local Libraries sections appear only if the respective directories and files exist in the workspace.
Hovering over the <Package Name> item reveals a terminal icon. Clicking this icon opens a terminal window at the package's root directory, allowing you to execute commands directly within that directory.
Installed Packages
The Installed Packages section lists libraries installed using the Lingo package manager. Developers can use the Lingo package manager to retrieve and install LF programs from arbitrary GitHub repositories. A collection of useful packages can be found in the Lingua Franca Packages GitHub organization.
To install packages:
- Configure the
Lingo.tomlfile with the desired package. - Run lingo build in the terminal from the current directory to download the specified dependencies.
Once the packages are installed, they will appear in the ./build/lfc_include/ directory. The Installed Packages section will then be structured as follows:
├── <Package Name>
│   ├── Installed Packages
│   │  ├── <Installed Package>
│   │  │   ├── File_1.lf
│   │  │   │   ├── Rusable_Reactor_1.lf
│   │  │   │   ├── Rusable_Reactor_2.lf
│   │  │   ├── File_2.lf
│   │  │   │   ├── Rusable_Reactor_1.lf
│   │  │   │   ├── Rusable_Reactor_2.lf
...
In this structure:
- <Package Name>: Represents the root folder of the main package.
- <Installed Package>: Represents each package listed in
Lingo.toml, which contains one or more LF projects featuring reusable reactors.
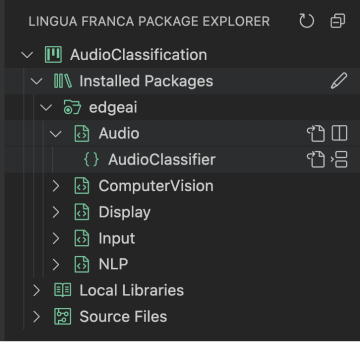
The image below shows a visual representation of the Installed Packages section. The project icon indicates the LF Package folder (e.g., AudioClassification), while the root-folder icon represents the downloaded package (e.g., the edgeai package in the example). The code file icon denotes an LF program within a package, and the bracket icon represents individual reactors inside the LF program.
The hierarchy categorizes tree items into the following types:
- package root: Refers to the root folder of each downloaded package.
- file: Represents an LF file within the package.
- reactor: Refers to individual reactors within the LF file.
When focusing on the Installed Packages section, an edit command becomes available. Clicking it opens the Lingo.toml file in the editor for configuration changes. The following actions are available for items in the Installed Packages section:
- For file items (from right to left):
- Open in Split View: Opens the file in a split editor view.
- Go To File: Navigates to the file in the editor.
- For reactor items (from right to left):
- Import Selected Reactor: Imports the selected reactor into the active LF program.
- Go To File: Opens the file where the reactor is defined.
- Open in Split View: Opens the file in a split editor view (accessible by right-clicking the item).
The Import Selected Reactor option is available only if an LF program is open in the editor.
Local Libraries
The Local Libraries section lists LF programs created by the developer, located in the ./src/lib/ directory. These programs serve as local libraries, containing reusable reactors. The directory structure follows this format:
├── <Package Name>
...
│   ├── Local Libraries
│   │  ├── File_1.lf
│   │  │   ├── Rusable_Reactor_1.lf
│   │  │   ├── Rusable_Reactor_2.lf
│   │  ├── File_2.lf
│   │  │   ├── Rusable_Reactor_1.lf
│   │  │   ├── Rusable_Reactor_2.lf
...
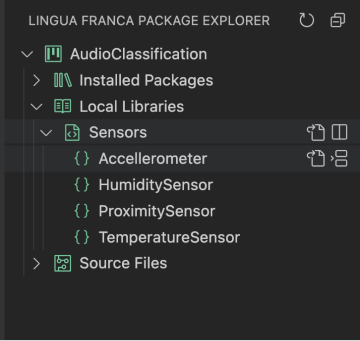
The image below illustrates the Local Libraries section. In this depiction, the "project" icon represents the LF package folder, while the "code file" icon represents the LF program, and the "bracket" icon denotes individual reactors within the LF program.
The hierarchy categorizes tree items into two types:
- file: Represents the LF file.
- reactor: Represents a reactor within the LF file.
Actions for Local Libraries are similar to those in the Installed Packages section:
- For file items (from right to left):
- Open in Split View: Opens the file in a split editor view.
- Go To File: Navigates to the file in the editor.
- For reactor items (from right to left):
- Import Selected Reactor: Imports the selected reactor into the active LF program.
- Go To File: Opens the file where the reactor is defined.
- Open in Split View: Opens the file in a split editor view (accessible by right-clicking the item).
The Import Selected Reactor option is available only if an LF program is open in the editor.
Source Files
The Source Files section lists all LF programs in the ./src/ directory. This section provides direct access to the main source files of the package. The hierarchy for this view is straightforward:
├── <Package Name>
...
│   ├── Source Files
│   │  ├── File_1.lf
│   │  ├── File_2.lf
│   │  ├── File_3.lf
...
Clicking on any of the files will open the corresponding LF program in the editor, providing a way to quickly navigate and edit the source code of a package.
Notes
For Python Users
Users who edit LF programs with a Python target will benefit the most from Python linting by installing Pylint 2.12.2 or later.